Authentication in Azure AD B2C
The tale of two portals
In the previous part of this series we learned how to incorporate simple authentication with Azure AD (B2E) into vanilla ASP.NET MVC App. As a prerequisite, we had to create a bunch of entities in Azure Portal (https://manage.windowsazure.com). In this blog post I will show how to achieve a similar thing but with Business to Consumer (B2C) flavour of Azure Active Directory and we will learn what are some additional benefits of using B2C.
This is also a moment where new Azure portal needs to be introduced: https://portal.windowsazure.com. There are several entry points to this new management tool, one of them is a banner that will bug you to “Check out the new portal” in classic Azure portal: https://manage.windowsazure.com. Please note that if you want to play with B2C you must use the new portal because classic one is simply unaware of most B2C features and configuration options.
B2C is a different type of Azure Active Directory and you decide if a given AD will be B2C while creating it. In legacy portal click NEW, App Services, Active Directory, Directory, Custom Create. In Add Directory dialog remember to select This is a B2C directory checkbox. Interestingly enough, you cannot add a B2C AD from withing new portal because at the time writing this (22/1/2017) Microsoft did not finish adding support for that in new portal. Things essential to B2C AD configuration are supported though and not available in legacy portal. You just can’t create a directory here. Madness!
So, once you create a B2C directory from withing legacy portal, you can use new portal’s UI to create app and user in your newly created directory. This process is pretty much the same as for B2E, so I will not cover the details here. Once setup is done, you need Client Id and Tenant to replace values in a configuration in our B2E example and sign in process should work the same. Remember to use an account from B2E directory!
B2E Policies
We’ve got to the point where we’re stuck again with a pre-defined set of users, no sign-up, no federation with other identity providers, nothing fancy. But this is where it gets interesting. We need to create and incorporate a policy. Head to the old portal, navigate to a landing page for your B2C directory and click Manage B2C settings link. It will redirect you to the new portal (told’ya - madness!) and open AZURE AD B2C SETTINGS section automatically. Let’s see how we can set up our application with an onboarding process for users from internet.
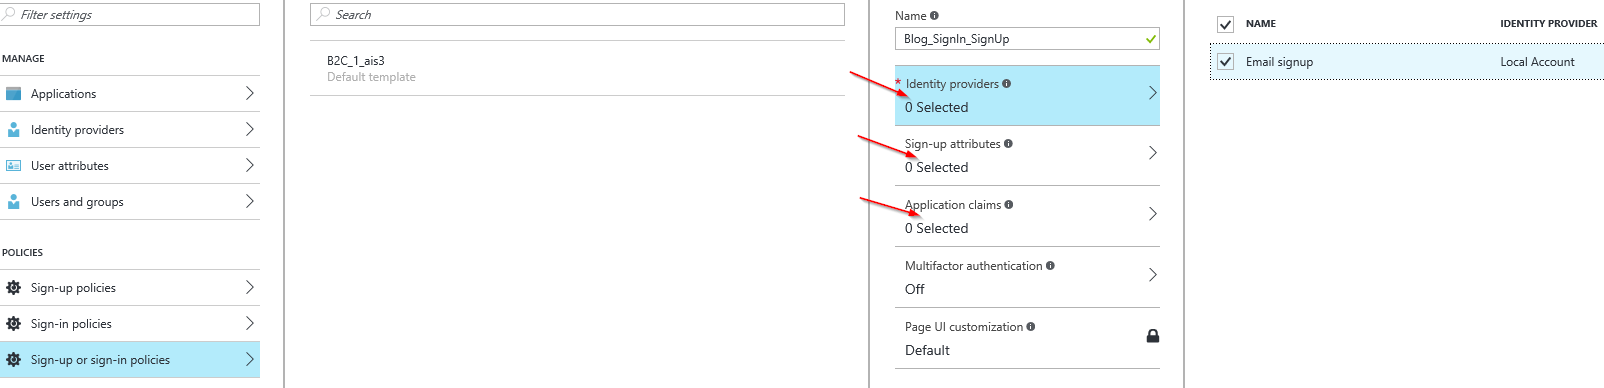
Go to Sign up or sign-up policies, click Add, give it a name (I named it blog_policy so the full name will be B2C_1_blog_policy) and in Identity providers section select Email signup. It is the only build-in azure sign up policy which also has an advantage of not having any additional configuration. For users it will be as simple as it can be - their new accounts will be associated with their emails, they will have to create a password and it will essentially create a new account in our B2C directory.
You might also want to add Display Name Sign-up attribute and Application claim to your policy. It will another field on the registration form generated by Azure, which will correspond to proper Claim in OpenIdConnect payload returned after Sign-in.
You can test the process orchestrated by this policy by selecting it on the list of Sign-up or sign in policies and choosing Run now.
Notice that Run now button navigates to the following URL:
https://login.microsoftonline.com/aisappengine.onmicrosoft.com/oauth2/authorize?p=B2C_1_blog_policy&client_Id=09866094-b889-46f4-8903-1e66799518df&nonce=defaultNonce&redirect_uri=http%3A%2F%2Flocalhost%3A44404%2F&scope=openid&response_type=id_token&prompt=login
It is pretty much the same as a redirect URL in B2E scenario but there’s a p (as in policy) query string parameter which is triggering proper behavior on Azure side. Our whole programming task right now is to convince MVC to include proper policy name when automatically redirecting to Azure when it encounters Authorize attribute.
Give me the code
First we need to update a package listed below, because it doesn’t play nicely with B2E for some reason.
Update-package Microsoft.IdentityModel.Protocol.Extensions
Next, our OpenIdConnectAuthenticationOptions object needs to be adjusted a bit in comparison to the one we’ve had previously for B2E.
string policy = "B2C_1_Blog_SignIn_SignUp";
app.UseOpenIdConnectAuthentication(
    new OpenIdConnectAuthenticationOptions
    {
        ClientId = WebConfigurationManager.AppSettings["ida:ClientId"],
        MetadataAddress = string.Format(
            "https://login.microsoftonline.com/{0}/v2.0/.well-known/openid-configuration?p={1}",
            WebConfigurationManager.AppSettings["ida:Tenant"],
            policy),
        RedirectUri = "http://localhost:44404/"
    });
MetadataAddress = is the line responsible of understanding p parameter. If you remember from the previous post, by default middleware automatically looks for a openid contract at the location as configured in azure:
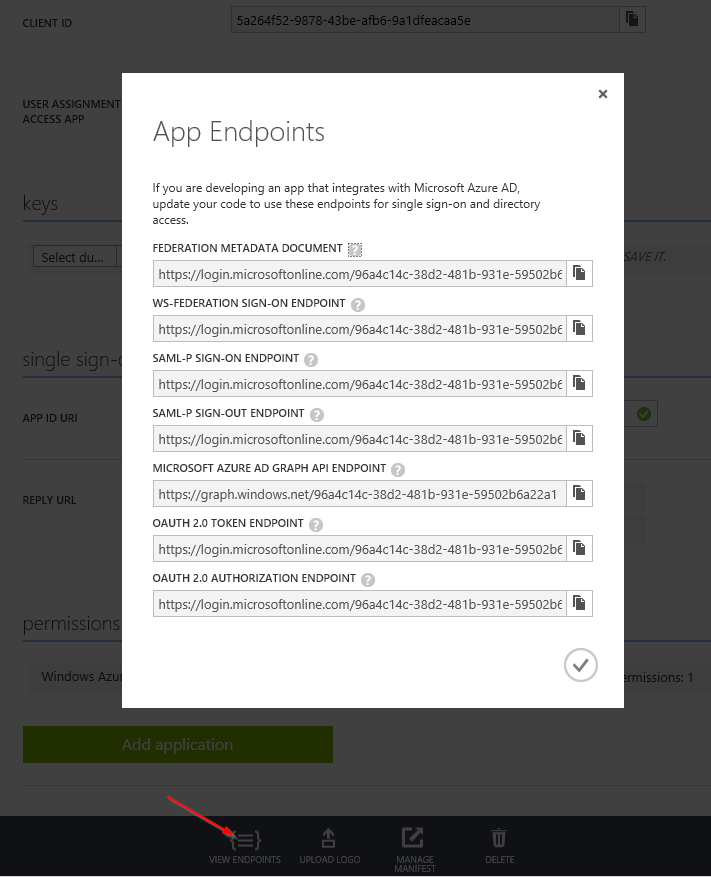
With MetadataAddress = we give a hint to the middleware where new, policy-aware configurations are being hosted.
Some articles and blog posts on the topic also advise to set Scope+ and _Response properties which drive the OpenidConnect/OAuth2 flows to openid and id_token, which by default are openid+profile and code+id_token respectively.
With the changes listed above applied, you should be able to run the app, be redirected to azure login page that allows user registration via email. After quick registration process (that requires email validation via email sent by azure) your brand new account will be created and after successful authentication you’ll be greeted as previously… or not.
As you can see in the snippet below, we get all the data we need, MVC just can’t understand which payload part is user identifier:
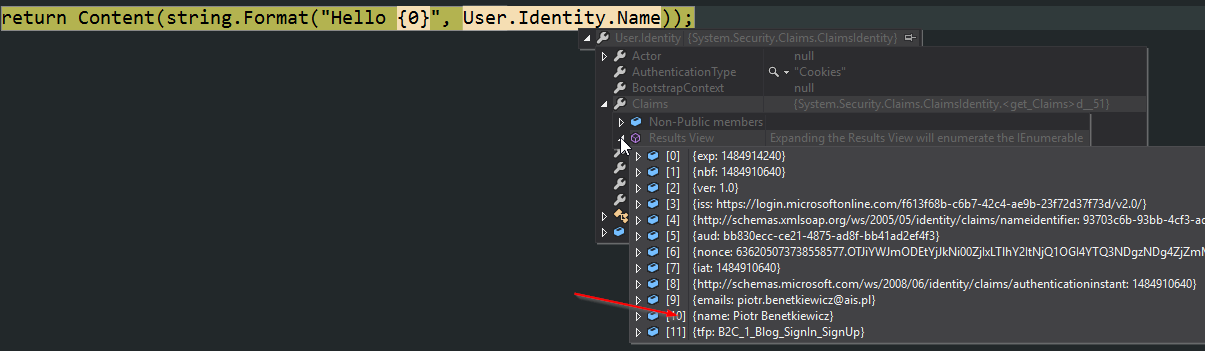
We can help it with the following addition to OpenIdConnectAuthenticationOptions:
TokenValidationParameters = new TokenValidationParameters
{
    NameClaimType = "name"
}
Expanding
With this code in place, app will greet each user correctly, but now users can register in the app by themselves and this process is totally outsourced to Azure AD. How cool is that? Other cool thing is enabling other identity providers. Instead of using email signup, users will be able to use their existing facebook, google or linkedin accounts, and again - entire process is outsourced to Azure.
Having authentication in place, is many scenarios it’ll be time to start authorizing user access to various resources in your application, which will be covered in the next part of the series.